Soil Sampling Helps Spend Fertilizer Dollars Wisely
Monitoring soil fertility levels will save you money. The greatest return on investment is obtained when fertilizer and lime rates are based on soil test results. At ServiTech, our goal is to help producers raise their crops as efficiently and profitably as possible. ServiTech Laboratories make recommendations that supply nutrients for plant growth and allow for soil fertility maintenance and buildup over a period of time.
Accuracy is important
Effective and profitable fertilizer recommendations require an accurate sample of the field. It is very important that the sample accurately represent the field to be fertilized. Previous crop history, previous lime and fertilizer rates, and soil characteristics will cause variance in results if not accounted for while sampling.
 Separate field into separate zones
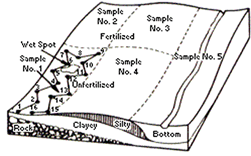
If cropping, fertilization and/or liming has not been uniform on a field, then a separate sample should be taken from each management or soil area. If fields are large, you may want to sample 40 acre units separately, but up to 80 acres may be sampled together if management has been the same and the soil type is uniform. If soil areas within a field are different in appearance (slope, drainage, color or texture), each soil area should be sampled separately. Small areas may not need to be sampled separately, but doing so will give some indication of the variation within the field. The decision to fertilize small areas differently than the rest of the field should be based on factors such as yield advantage, total cost of treatment, and the practicality of treating small areas individually.
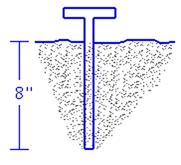
About 15 individual cores of uniform size and depth collected from throughout the sampling zone or area should be composited in a clean, plastic bucket. A proper sample is a core taken from the surface to a depth of 8 inches. Mix these cores thoroughly and fill the sample bag. Label the bag clearly and use this same information and identification on the soil test information form. Follow a random pattern when sampling an area, avoid unusual spots, and try to obtain a well-balanced, representative sample.
Subsoil Sampling
Subsoil sampling can be used as an effective tool for better fertility and insurance against groundwater contamination. Subsoil samples can be analyzed for nitrate, ammonium, chloride, sulfate-sulfur, and other mobile nutrients.
Nutrients in the subsoil are available because plants have deep rooting patterns. The common root zone depth for most plants is three to four feet. The majority of plant roots concentrate within the upper two feet of the soil profile.
Subsoil samples are most commonly analyzed for nitrate-nitrogen. Nitrate is soluble and will leach into the subsoil. Sources of nitrate include nitrogen applied to crops as fertilizer, manure, water, previous legume crops, and the decomposition of organic matter.
More efficient nitrogen fertilizer recommendations are made with subsoil sampling, enabling proper management, and improved nitrate utilization by the crop.
Keep subsoil samples separate from surface samples. After taking a surface sample (usually 0 to 8 inches), use the soil probe to sample the soil to at least a depth of 24 inches. Subsoil sampling depth should be adjusted to the crop rooting depth.
The subsoil samples should include cores from five to eight locations in the sampling area. Thoroughly mix the soil cores and place them in the sample bag. Write on the bag and information sheet the depth increment (e.g. 8 to 24 inches) and the test(s) desired.
Subsoil samples are always recommended; however, they are especially important when the field history includes manure application, crop failure (yield reduced by a third or more), or a previous alfalfa, soybean, or other legume crop. Subsoil samples are essential when sugar beets, cotton, or malting barley are grown.
For profitable crop production
Define field areas to be sampled separately. One sample should represent 40 to 80 acres.
Use a soil probe or spade to collect fifteen cores per sampling area. Be careful to collect each core to a uniform depth of 6 to 8 inches.
Thoroughly mix the cores in a plastic bucket. DO NOT USE METAL OR RUBBER CONTAINERS. Place mixed samples in the bags provided by the laboratory.
Ship samples to the lab promptly. If samples will not be shipped for several days, freeze the samples until they can be shipped to avoid changes in the chemical composition of the sample that could alter the analysis.
Select realistic yield goals and follow through with proper application of suggested nutrients.
Soil sampling tools
 There are two important requirements of a sampling tool. First,it must permit a uniform slice to be taken from the soil surface to a desired depth. Second, it must collect the same volume of soil from each sample site. Tools that can be used are a spade or soil probe. A soil probe is the best tool for obtaining soil samples. Push the probe to the 8 inch depth and remove the core. Place it in a clean, plastic bucket. For a representative, composite sample, at least 15 cores should be pulled and thoroughly mixed.
If a soil probe is not available, a small shovel or a spade can work satisfactorily when used properly. Dig out a spadeful or two of soil to a depth of 8 inches, smooth off one vertical edge of the hole. Take a slice of soil about 1/2 inch thick, with the spade. Using a trowel, cut a 1/2 core lengthwise from the center of the slice while it is still on the spade. Put the core in a bucket to be mixed with the 15 other cores from the designated sampling area.

